Wednesday, June 30, 2010

From place mat to handbag

What you need..
Ribbon
place mat
pins
sewing machine

First, lay out your place mat and measure & pin your ribbon. When you pin it you want to make the handles about 16 inches long.
After you have it pinned where you want it sew the ribbon to the place mat.
Now with the right sides facing each other sew the place mat together. After you have in sewn, take the corners by the opposite sides and make about a 2inch triangle, and sew. (you will sew over your seam) Do this to both sides. This will make it so the bag has a flat bottom and will stand up by its self.
Now you have a cute, very easy handbag.
Different once we have made.

Thursday, May 20, 2010

Baby blanket 101

What you need...
2 yards of different fabric. (1 yard of each)
scissors
yard stick
sewing machine

Once you have your fabric picked out and have 1 yard of each the first thing you want to do is place the fabric together with the right sides facing each other (right sides meaning front).
If you want to, to make it easier you can pin the fabric together.
With the right sides facing each other, sew the fabric together around the edges. It is best NOT to start at a corner.
Now that you have it sew together, I always cut the corners off so that it has no fabric bunched when you turn it right side out.
Now its time to turn it right side out.
Once you have it right side out, I always run a year stick along the edge and in the corners to make sure no fabric is bunched and so it all pushed through.
Now its time to sew again. Make sure to sew up the spot where you pulled the fabric through to do so just fold the fabric in as you sew and you will never know there was a space there.Sew around the edge one more time to give it a finished look.
And now you have a cute double sided baby blanked. This is just a closer look at the edge.
Finished blanket. This one is going to my niece who was born last week.
This is a boy blanket that I made for my friends baby. The possibility are endless with these blankets and most everyone in my life who has a baby gets one. They are easy & fun to make.

Monday, May 17, 2010

Ace of Cakes? Not so fast...

I made a goal this year that I wouldn't purchase any store bought cakes for special occasions this year. I wanted to make all the cakes. I'm not talking about tossing a can of frosting on top of the cake, I'm talking about some serious decorating for these cakes! With Katelyn's birthday came my opportunity to my skills (or lack thereof) to the test!

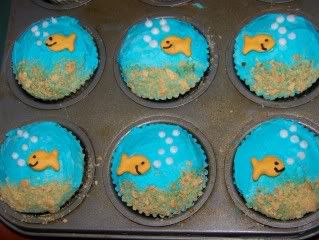
Katelyn had a water party with all of her friends, so I wanted to come up with a design that went along with the party theme. An ocean cake with fishies is what I came up with...

Photobucket

Photobucket


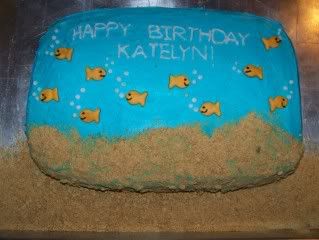
My writing skills leave something to be desired, but I think I pulled off a decent cake for my first shot!

I was able to get the blue ocean color by using Wilton icing color. It's a more concentrated product than your standard food coloring, which is watered down.

The sand on the bottom of the ocean is crushed graham crackers. If you want to take the sand a step further, you can add edible glitter to the graham crackers, to make the sand glisten like real sand. I really wanted to do this for Katelyn's cake, but time was definitely not on my side for this one!

The fish are Goldfish crackers. I'm not sure exactly how I came up with the idea to use the Goldfish. I think I might have seen it used in one of the million cupcake decorating books I've seen in the past few months.

Originally I had made all the frosting, including what I needed to use for the writing and smaller details (bubbles, fishie faces). For whatever reason, the batch of icing I made for the white and black icing became hard as a rock, so I had to run to Micheal's at the last minute to grab a couple tubes of colored frosting to finish the job. I always wondered why on earth someone would buy frosting in a tube like that...now I know why! FAIL! ;)

It took me all day to make the cake and cupcakes, but it sure was a ton of fun to make! Now time to put my creative juices towards Aiden's birthday cake next month! Think, think, think...

Thursday, May 13, 2010

Crafty family members welcome!!

I have invited some of my more creative brain family members to join me on this blog. Welcome and enjoy!

Wednesday, May 5, 2010

Beaded Socks

This year for Christmas I am make the little girls in my life beaded socks. They are super cute and super easy! What you need...

  • Small crochet hook
  • crochet thread
  • socks
  • craft beads
All you need to do it single crochet around the sock and the second time around the sock add the beads by chaining 3 (if you want then to dangle more add more chains) adding the bead on the hook then crochet like you normally would.
What you get when your done!
Cute little beaded socks!

Sunday, May 2, 2010

Wow!

Its only been about 6 months from when I planned on doing this blog... Oops. Now I am ready to get it moving!! Stay tuned...